从开源项目重学C语言-vscode配置
计划
从youtube上找到一个大神讲解学习路线,计划第一个学习的开源项目是cJSON
1. 下载源码,并跑通IDE的debug
我这边使用的ide是vs code,除了跑跑xcode的项目,第一次接触c语言工程的编译,发现有很大的不同。
- 下载安装vscode的插件C/C++、CMake、CMake Tools、Code Runner
- 说实话,本人比较笨,ide和插件都弄好了,要debug起来,还是研究了好久,搜索了一堆“macos vscode c 多文件调试、C 多文件编译”等等,文章推荐大多都是用Makefile,所以下面会有Makefile使用的基本讲解
2. Makefile使用
主要教程可以参考:如何使用Makefile、Make 命令教程、Makefile使用总结、跟我一起写Makefile
Makefile文件是和make命令一起配合使用的,主要用于解决项目中各种库和代码之间的依赖关系。当然Makefile还能组织我们平时的一些日常操作(shell命令)。
代码变成可执行文件,叫做编译(compile);先编译这个,还是先编译那个(即编译的安排),叫做构建(build)。
Make是最常用的构建工具,诞生于1977年,主要用于C语言的项目。但是实际上 ,任何只要某个文件有变化,就要重新构建的项目,都可以用Make构建。
例如我有三个文件,main.c ioput.c calc.c,Makefile文件如下:源码来源
1
2
all: calc ioput.c main.c
	gcc -o calc main.c ioput.c calc.c
1
2
3
4
5
6
7
8
9
10
11
12
13
test|⇒ make
gcc -o calc main.c ioput.c calc.c
test|⇒ ./calc
Enter the year:2021
Enter the month:2

     February 2021
Su Mo Tu We Th Fr Sa
    1  2  3  4  5  6
 7  8  9 10 11 12 13
14 15 16 17 18 19 20
21 22 23 24 25 26 27
28
Makefile还有挺多用法的,我这里暂时先不研究了,抓紧去学习cJSON了
3. CMakeLists.txt的使用
https://zhuanlan.zhihu.com/p/67022315
先安装cmake
1
brew install cmake
用vs code用这篇文章的方法利用VScode和cmake编译构建C++工程代码
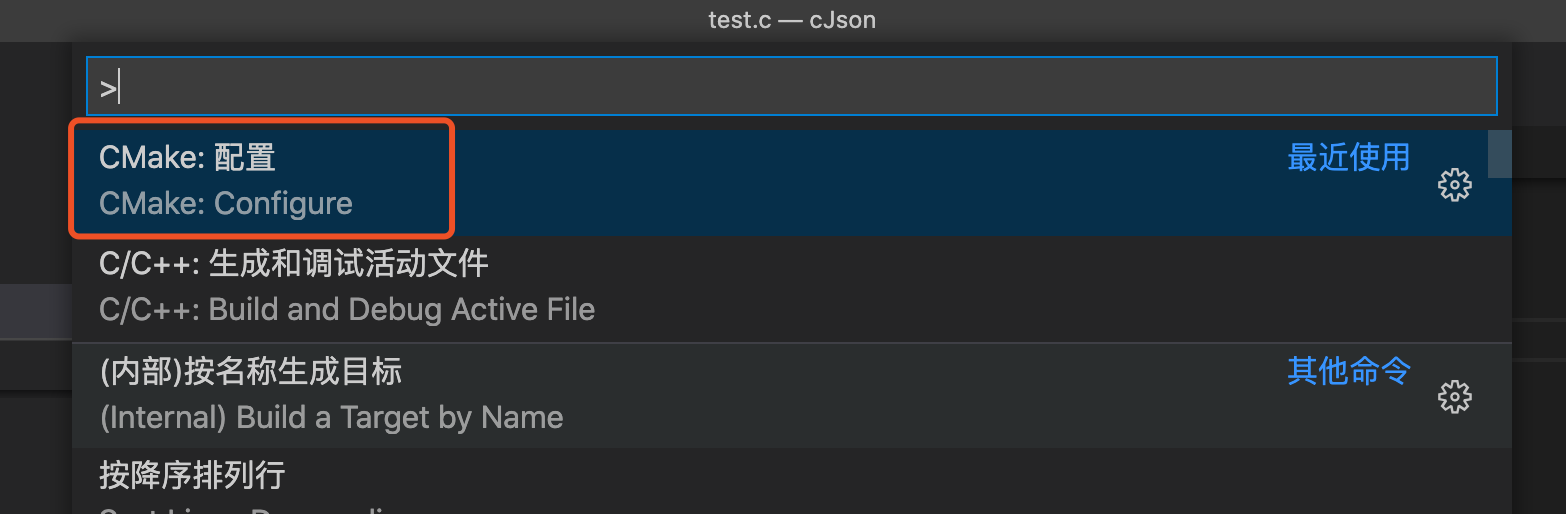
安装CMake Tools的扩展,调用命令台工具(command+shift+p),然后选中CMake: Configure
1
2
3
4
5
6
7
8
9
10
11
12
13
14
15
16
17
[main] 正在配置文件夹: cJson
[proc] 执行命令: /usr/local/bin/cmake --no-warn-unused-cli -DCMAKE_EXPORT_COMPILE_COMMANDS:BOOL=TRUE -DCMAKE_BUILD_TYPE:STRING=Debug -DCMAKE_C_COMPILER:FILEPATH=/usr/bin/clang -DCMAKE_CXX_COMPILER:FILEPATH=/usr/bin/clang++ -H/Users/qiujunyun/Documents/WorkSpace/CC++/cJson -B/Users/qiujunyun/Documents/WorkSpace/CC++/cJson/build -G "Unix Makefiles"
[cmake] Not searching for unused variables given on the command line.
[cmake] -- Configuring done
[cmake] CMake Warning (dev):
[cmake]   Policy CMP0042 is not set: MACOSX_RPATH is enabled by default.  Run "cmake
[cmake]   --help-policy CMP0042" for policy details.  Use the cmake_policy command to
[cmake]   set the policy and suppress this warning.
[cmake]
[cmake]   MACOSX_RPATH is not specified for the following targets:
[cmake]
[cmake]    cjson
[cmake]
[cmake] This warning is for project developers.  Use -Wno-dev to suppress it.
[cmake]
[cmake] -- Generating done
[cmake] -- Build files have been written to: /Users/qiujunyun/Documents/WorkSpace/CC++/cJson/build
提示所有库都找到了。
然后我们点击下面的debug按钮:

就可以进行debug了
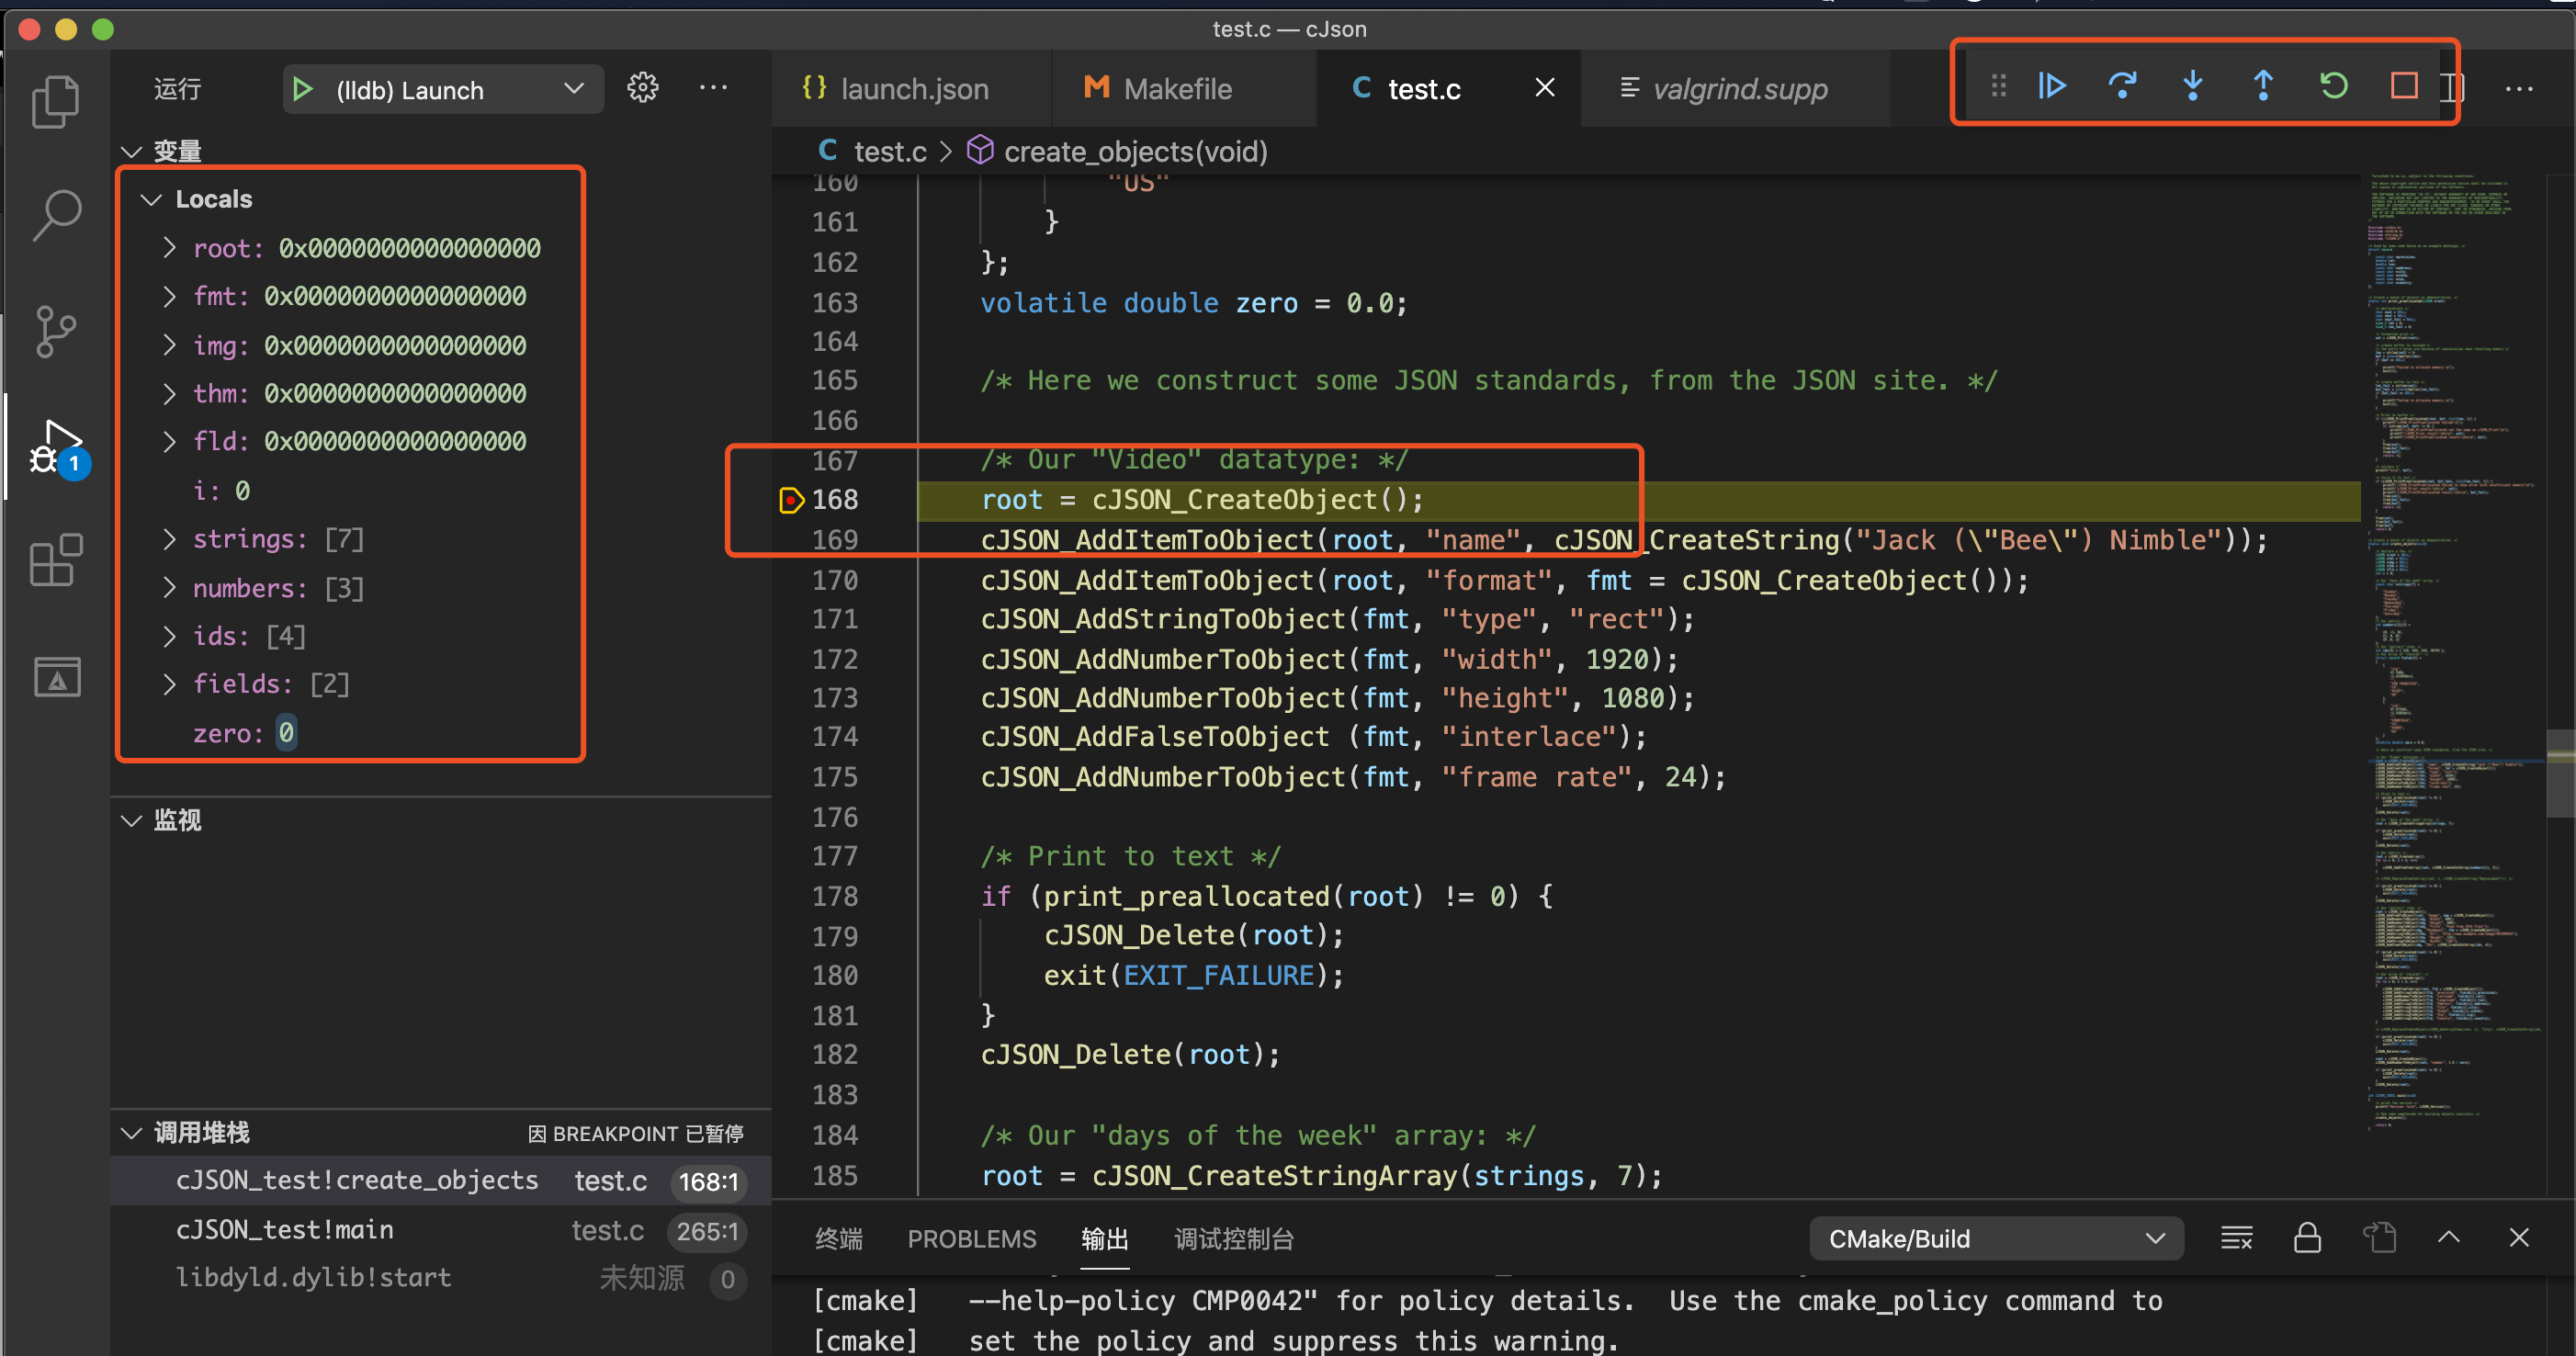
4. vscode的调试工具
官方文档见Debugging
主要是 两个文件的配置:launch.json和task.son VSCode 结合Makefile设置调试方法
具体可以查看我弄好的tinyhttpd的调试例子,这里用的是结合makefile的方式去debug的,当然也可以不用makefile,直接添加一个编译的task,如windows 10上使用vscode编译运行和调试C/C++
下面贴下例子:
Launch.json,其中preLaunchTask指向的就是tasks.json中的task
1
2
3
4
5
6
7
8
9
10
11
12
13
14
15
16
17
18
19
20
21
{
    // 使用 IntelliSense 了解相关属性。
    // 悬停以查看现有属性的描述。
    // 欲了解更多信息,请访问: https://go.microsoft.com/fwlink/?linkid=830387
    "version": "0.2.0",
    "configurations": [
        {
            "name": "debug",
            "type": "cppdbg",
            "request": "launch",
            "program": "${workspaceFolder}/httpd",
            "args": [],
            "stopAtEntry": false,
            "cwd": "${workspaceFolder}",
            "environment": [],
            "externalConsole": true,
            "MIMode": "lldb",
            "preLaunchTask": "build-debug"
        }
    ]
}
tasks.json
1
2
3
4
5
6
7
8
9
10
11
12
13
14
15
16
17
18
19
20
21
22
23
24
25
26
27
28
29
30
31
32
33
34
35
36
37
38
39
40
41
42
43
44
45
{
    // See https://go.microsoft.com/fwlink/?LinkId=733558
    // for the documentation about the tasks.json format
    "version": "2.0.0",
    "tasks": [
        {// 这个就是使用gcc的方式
            "label": "complie",
            "type": "shell",
            "command": "gcc",
            "args": [
                "-W",
                "-Wall",
                "-lpthread",
                "-g",
                "${file}",
                "-o",
                "${fileDirname}/${fileBasenameNoExtension}"
            ],
            "options": {
              "cwd": "${workspaceFolder}"
            }
        },
        {// 这个就是使用makefile的方式
            "label": "build-debug",
            "type": "shell",
            "command": "make",
            "args": [
                "debug"
            ],
            "problemMatcher": [],
            "group": {
                "kind": "build",
                "isDefault": true
            }
        },
        {
            "label": "clean",
            "type": "shell",
            "command": "make",
            "args": [
                "clean"
            ]
        }
    ]
}
5. 其他
还能使用命令行工具gdb来进行debug调试gdb 调试利器,在mac是使用lldb,命令是一样的
首先编译一定要加 -g 这样调试才能看到代码
同样以tinyhttpd项目为例子,lldb的调试最后就是这样的,命令行创建断点,命令行run
1
2
3
4
5
6
7
8
9
10
11
12
13
14
15
16
17
18
19
20
21
22
23
24
25
26
27
28
29
30
31
32
33
34
2tinyhttpd|master⚡ ⇒ gcc -W -Wall -lpthread -g -o httpd httpd.c
2tinyhttpd|master⚡ ⇒ lldb httpd
(lldb) target create "httpd"
Current executable set to '/Users/rambo/Documents/MyProject/CC++/2tinyhttpd/httpd' (x86_64).
(lldb) b 584
Breakpoint 1: where = httpd`main + 54 at httpd.c:584:39, address = 0x0000000100003a16
(lldb) run
Process 30789 launched: '/Users/rambo/Documents/MyProject/CC++/2tinyhttpd/httpd' (x86_64)
Process 30789 stopped
* thread #1, queue = 'com.apple.main-thread', stop reason = breakpoint 1.1
    frame #0: 0x0000000100003a16 httpd`main at httpd.c:584:39
   581 	 //pthread_t newthread;
   582
   583 	 server_sock = startup(&port);
-> 584 	 printf("httpd running on port %d\n", port);
   585
   586 	 while (1)
   587 	 {
Target 0: (httpd) stopped.
(lldb) next
httpd running on port 60876
Process 30789 stopped
* thread #1, queue = 'com.apple.main-thread', stop reason = step over
    frame #0: 0x0000000100003a28 httpd`main at httpd.c:589:24
   586 	 while (1)
   587 	 {
   588 	  //阻塞等待客户端的连接,参读《TLPI》P1157
-> 589 	  client_sock = accept(server_sock,
   590 	                       (struct sockaddr *)&client_name,
   591 	                       &client_name_len);
   592 	  if (client_sock == -1)
Target 0: (httpd) stopped.
(lldb) quit
Quitting LLDB will kill one or more processes. Do you really want to proceed: [Y/n] Y