iOS秒开H5实战总结
iOS平台的H5网页加载步骤:
初始化 webview -> 请求页面 -> 下载数据 -> 解析HTML -> 请求 js/css 资源 -> dom 渲染 -> 解析 JS 执行 -> JS 请求数据 -> 解析渲染 -> 下载渲染图片
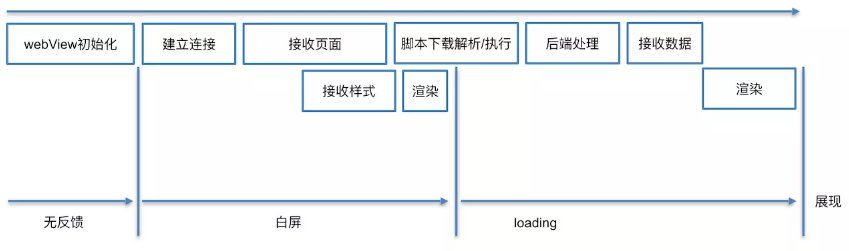
优化的就是从WebView到Dom渲染这一段,总结如下:
- 降低请求量:合并资源,减少http请求数量
- 加快请求速度:预解析DNS,减少域名数,并行加载,CDN分发
- 缓存:离线缓存
- 渲染
其中本问主要对客户端能做的事情,进行总结:
- 离线缓存的web容器离线方案,主要是预先缓存一些静态资源(HTML/JS/CSS/图片等资源),使用H5拦截技术,对要加载的资源进行拦截使用缓存中的。
- Prefetch:用移动端来并行H5的请求,好比请求缓存
- 容器预热:在计算机空闲的时候,就预热好一个webview在内存中,等待下一次使用
- 预解析DNS、CDN分发
1. web容器离线包方案
最关键的环节就是拦截 WebView 发出的请求将资源映射到本地离线包
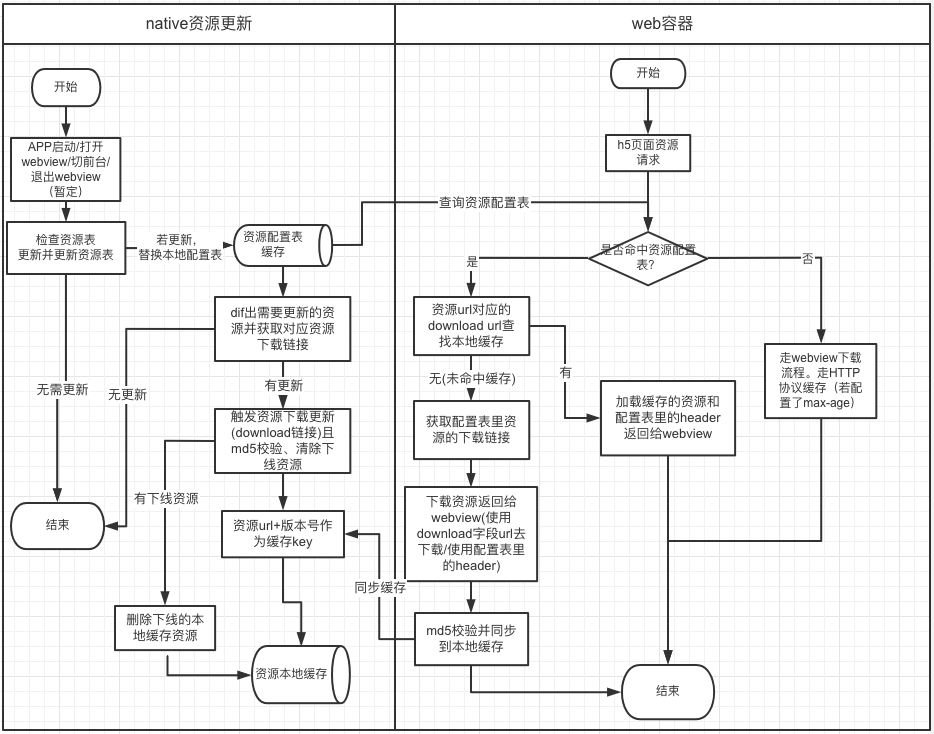
资源更新
配置表样例
1
2
3
4
5
6
7
8
9
10
11
12
13
14
15
16
17
18
19
20
21
22
23
24
// 20210510172834
// http://xcache.*****/xcache-provider/xhr/client/configure.json

{
  "code": 200,
  "data": {
    "version": "553",
    "update": true,
    "resourcemap": {
      "https://*****/ares/0518c371936fd611fc3b897a76c11111.js": {
        "version": "1",
        "md5": "0518c371936fd611fc3b897a76c11111",
        "download": "https://*****/hxm/tech/xcache/1/516/1/cb71c52a-bf85-96e34144a405/https%253A%252F%252F*****%252Fares%252F0518c371936fd611fc3b897a76c11111.js",
        "ctype": "application/javascript;charset=UTF-8"
      },
      "https://*****/ares/43a2f767500fd1a14b07b5fcc6811111.js": {
        "version": "1",
        "md5": "43a2f767500fd1a14b07b5fcc6811111",
        "download": "https://*****/hxm/tech/xcache/1/515/1/ff5e9f80-ace1-4256-b20e-7a40a77c5919/https%253A%252F%252F*****%252Fares%252F43a2f767500fd1a14b07b5fcc6811111.js",
        "ctype": "application/javascript;charset=UTF-8"
      }
    }
  }
}
客户端使用资源的download url作为缓存key,找本地资源。
资源配置表检查更新接口 异常兜底,检查更新接口后端连续异常code 5次,使用的CDN上最新镜像。(APP内置最新CDN镜像链接)
资源配置表检查更新接口 触发时机:启动/打开webview/切前台/退出webview。配置表需要实时更新。
资源配置表检查更新接口,连续触发 疲劳度控制30s内不重复触发。
资源配置表随检查接口一起返回(若有更新)。
APP空闲时机WIFI环境下载资源,并且子线程队列下载优先级最低。
资源表里下线的资源需要删除本地已缓存的资源。
只diff配置表,不去diff资源文件。
- 比如用户配置表从200个增加到201个,那么只去下载第201个。即便本地前200个缓存文件因为上次app杀死并没有下载全 也不会去下载前200的资源文件。
资源url匹配规则url里#参数,如:
1
2
3
4
例如web页面的url为
https://www.example.com/topic/v1/pub/danV9fm7RGVU.html?_stat_referer=index&_stat_area=banner_2#param
可以命中下面的的离线资源:
https://www.example.com/topic/v1/pub/danV9fm7RGVU.html?_stat_referer=index&_stat_area=banner_2
CDN兜底策略
连续5次异常code(code!=200),切换内置的CDN兜底连接请求最新配置表
配置测试环境兜底CDN链接: https://www.example.com/hxm/tech/xcache_test/yanxuan/configure.json
和线上环境兜底CDN链接: https://www.example.com/hxm/tech/xcache/yanxuan/configure.json
本地根据版本号校验(版本号不相等)是否更新本地配置表
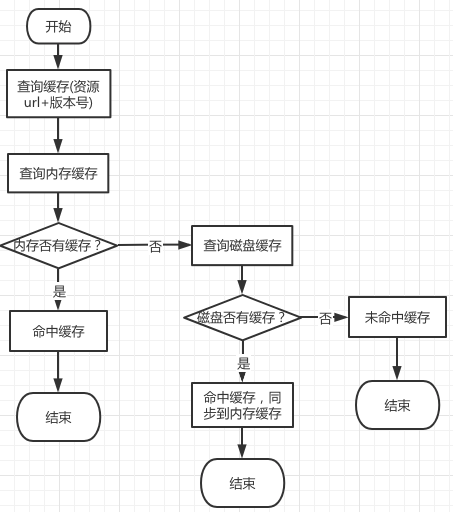
缓存
缓存是模仿
SDImageCache写的
资源缓存使用文件存储,以download的url作为缓存资源文件key。
内存缓存大小10M, 磁盘缓存大小100M(内存紧张释放内存缓存)。
支持两级缓存:内存缓存、磁盘缓存
H5请求拦截
核心思路是NSURLProtocol、wkwebview的body丢失和cookie同步的问题、wkwebview的NSURLPtotocol的私有API注册问题、以及NSURLProtocol的替换方案WKURLSchemeHandler
NSURLProtocol
NSURLProtocol是Foundation 框架里的URL Loading System的重要组成部分。它是一个抽象类,不能去实例化它,只能子类化NSURLProtocol,然后使用的时候注册子类。一个相对晦涩难解的类。
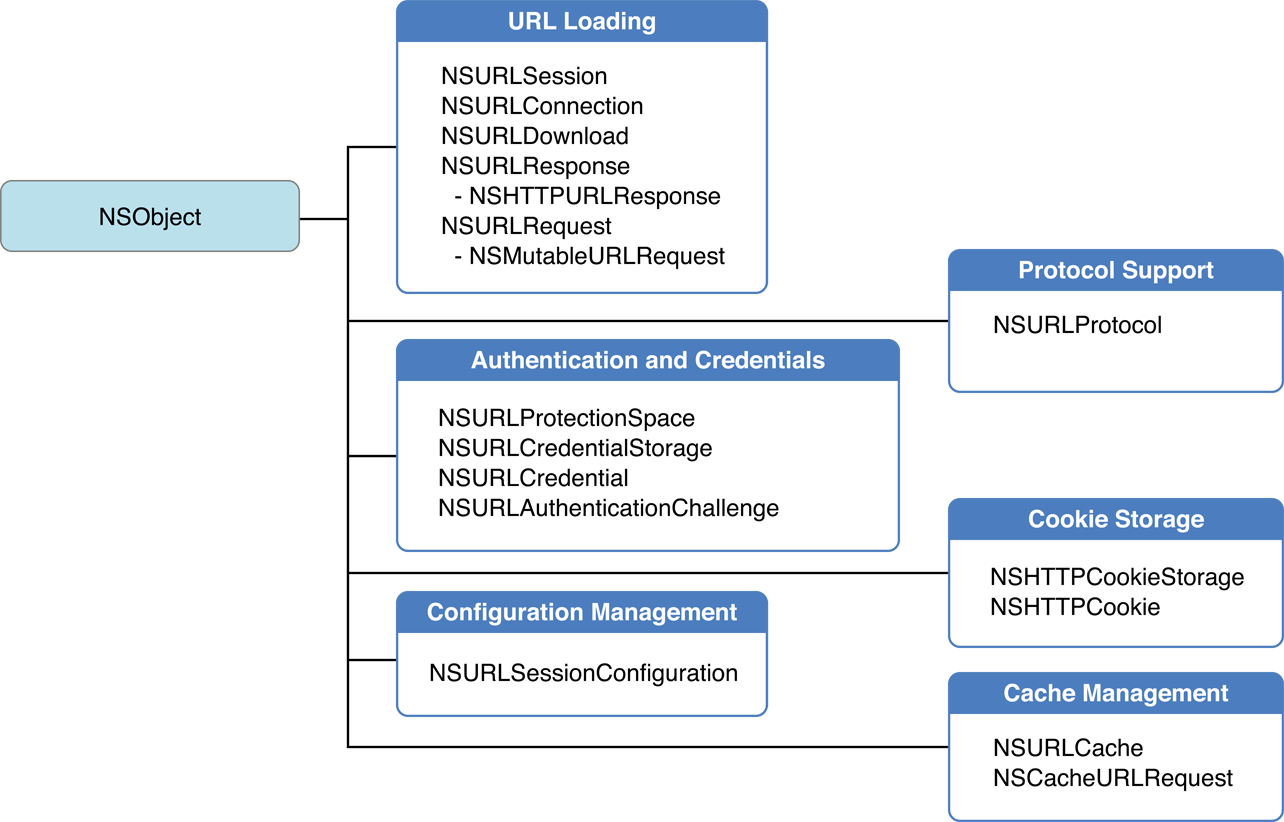
NSURLProtocol在iOS系统中大概处于这样一个位置:
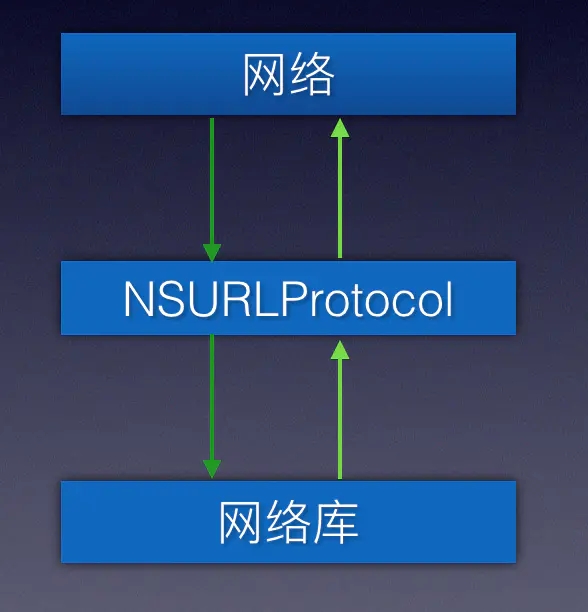
An NSURLProtocol object handles the loading of protocol-specific URL data. The NSURLProtocol class itself is an abstract class that provides the infrastructure for processing URLs with a specific URL scheme. You create subclasses for any custom protocols or URL schemes that your app supports.
可以拦截的网络请求包括NSURLSession,NSURLConnection以及UIWebVIew。基于CFNetwork的网络请求,以及WKWebView的请求是无法拦截的(需要特殊处理,使用系统的私有方法)。现在主流的iOS网络库,例如AFNetworking,Alamofire等网络库都是基于NSURLSession或NSURLConnection的,所以这些网络库的网络请求都可以被NSURLProtocol所拦截。 还有一些年代比较久远的网络库,例如ASIHTTPRequest,MKNetwokit等网路库都是基于CFNetwork的,所以这些网络库的网络请求无法被NSURLProtocol拦截。
我们使用苹果官方文档中的 CustomHTTPProtocol 进行介绍,你可以点击下载源代码查看。
使用NSURLProtocol
NSURLProtocol是一个抽象类,我们要使用它的时候需要创建它的一个子类。
1
2
@interface CustomHTTPProtocol : NSURLProtocol
@end
注册
对于基于NSURLConnection或者使用[NSURLSession sharedSession]创建的网络请求,调用registerClass方法即可。
1
[NSURLProtocol registerClass:[NSClassFromString(@"CustomURLProtocol") class]];
对于基于NSURLSession的网络请求,需要通过配置NSURLSessionConfiguration对象的protocolClasses属性。
1
2
NSURLSessionConfiguration *sessionConfiguration = [NSURLSessionConfiguration defaultSessionConfiguration];
sessionConfiguration.protocolClasses = @[[NSClassFromString(@"CustomURLProtocol") class]];
注册成功之后,就需要我们的子类去实现抽象方法:
1
2
3
4
5
6
7
8
9
// 决定请求是否需要当前协议对象处理,返回NO代表放过这个请求,不作处理。返回YES,代表需要处理,则会进入后续的流程。
+ (BOOL)canInitWithRequest:(NSURLRequest *)request;
// 统一处理请求 request 对象的,可以修改头信息,或者重定向。没有特殊需要,则直接return request;
+ (NSURLRequest *)canonicalRequestForRequest:(NSURLRequest *)request;
// 判断网络请求是否一致,一致的话使用缓存数据。没需要就调用 super 的方法
+ (BOOL)requestIsCacheEquivalent:(NSURLRequest *)a toRequest:(NSURLRequest *)b;
// 子类中最重要的方法就是 -startLoading 和 -stopLoading,实现请求和取消流程。不同的自定义子类在调用这两个方法是会传入不同的内容,但共同点都是要围绕 protocol 客户端进行操作。
- (void)startLoading;
- (void)stopLoading;
拦截
1
2
3
4
5
6
7
8
9
10
11
12
13
14
+ (BOOL)canInitWithRequest:(NSURLRequest *)request {
    //处理过的,放过
    if ([NSURLProtocol propertyForKey:URLProtocolHandledKey inRequest:request]) {
        return NO;
    }
    //只处理http和https的请求
    if (![@[@"http",@"https"] containsObject:[[request URL] scheme]]) {
      	return NO;
    }
    // 你的逻辑代码,需要和前端进行协议规定
    // 1. 本地是否有离线缓存
    // 2. 是否是被hook的请求,是否是ajax请求
    return NO;
}
1
2
3
4
// 请求经过 + canInitWithRequest: 方法过滤之后,我们得到了所有要处理的请求,接下来需要对请求进行一定的操作,而这都会在 + canonicalRequestForRequest: 中进行,虽然它与 + canInitWithRequest: 方法传入的 request 对象都是一个,但是最好不要在 + canInitWithRequest: 中操作对象,可能会有语义上的问题;所以,我们需要覆写 + canonicalRequestForRequest: 方法提供一个标准的请求对象
+ (NSURLRequest *)canonicalRequestForRequest:(NSURLRequest *)request {
	return request;
}
body丢失问题解决
1
2
3
4
- (id)initWithRequest:(NSURLRequest *)request cachedResponse:(NSCachedURLResponse *)cachedResponse client:(id<NSURLProtocolClient>)client {
	// 在这里去取native中自定义缓存住的body,然后放到request中,后续在wkwebview里面详解
	return [super initWithRequest:request cachedResponse:cachedResponse client:client];
}
startLoading
可以在这里修改请求信息,重定向,DNS解析,返回自定义的测试数据。URLProtocolHandledKey就一字符串
1
2
3
4
5
6
7
8
9
10
11
12
13
14
- (void)startLoading {
    NSMutableURLRequest *mutableReqeust = [[self request] mutableCopy];
    //request处理过的放进去
    [NSURLProtocol setProperty:@YES forKey:URLProtocolHandledKey inRequest:mutableReqeust];
    self.connection = [NSURLConnection connectionWithRequest:mutableReqeust delegate:self];
  	NSData *data = [@"testData" dataUsingEncoding:NSUTF8StringEncoding];
    NSURLResponse *response = [[NSURLResponse alloc] initWithURL:mutableReqeust.URL
                               MIMEType:@"text/plain"
                               expectedContentLength:data.length
                               textEncodingName:nil];
    [self.client URLProtocol:self didReceiveResponse:response cacheStoragePolicy:NSURLCacheStorageNotAllowed];
    [self.client URLProtocol:self didLoadData:data];
    [self.client URLProtocolDidFinishLoading:self];
}
stopLoading
1
2
3
4
- (void)stopLoading {
    [self.connection cancel];
    self.connection = nil;
}
WKWebView
iOS8以后,苹果推出了新框架Webkit,提供了替换UIWebView的组件WKWebView。WKWebView走的是WebKit和URL Loading System没有很大关系,但是还是会调用到URL Loading System中的方法。
WKWebView相对于UIWebView有各种好处,但是也有自己的问题,由于WKWebView的网络请求是在独立进程中进行,最终会通过IPC把请求Message发送给APP线程,苹果出于性能的考虑,把HTTPBody和HTTPBodyStream两个字段丢弃,导致我们只要开启拦截wkwebview就会丢掉post请求的body数据。
WKWebView和UIWebView的区别
引擎
WKWebView使用和手机Safari浏览器一样的Nitro JavaScript引擎,相比于UIWebView的JavaScript引擎有了非常重要的性能提升。
进程
wk多进程,在APP主进程之外执行。当内存超过了系统分配给WKWebView的内存时候,会导致WKWebView浏览器崩溃白屏,但是App不会Crash。(app会收到系统通知,并且尝试去重新加载页面)。相反的,UIWebView是和app同一个进程,UIWebView加载页面占用的内存被计算为app内存占用的一部分,当app超过了系统分配的内存,则会被操作系统crash。在整个过程中,会经常收到iOS系统的通知用来防止app被系统kill,但是在某些时候,这些通知不够及时,或者根本没有返回通知。
请求拦截方案对比
NSURLProtocol NSURLProtocol 默认会拦截所有经过 URL Loading System 的请求,因此只要 WKWebView 发出的请求经过 URL Loading System 就可以被拦截。经过尝试,发现 WKWebView 独立于应用进程运行,发出去的请求默认是不会经过 URL Loading System,需要我们额外进行 hook 才能支持,具体的方式见下文介绍
WKURLSchemeHandler WKURLSchemeHandler 是 iOS 11 引入的新特性,负责自定义请求的数据管理,如果需要支持 scheme 为 http 或 https请求的数据管理则需要 hook WKWebView 的 handlesURLScheme: 方法,然后返回NO即可。 经过一番尝试和分析,我们从以下几个方面将两种方案进行对比:
- 隔离性:
NSURLProtocol一经注册就是全局开启。一般来讲我们只会拦截自己的业务页面,但使用了NSURLProtocol的方式后会导致应用内合作的三方页面也会被拦截从而被污染。WKURLSchemeHandler则可以以页面为维度进行隔离,因为是跟随着WKWebViewConfiguration进行配置。 - 稳定性:
NSURLProtocol拦截过程中会丢失 Body,WKURLSchemeHandler在 iOS 11.3 之前 (不包含) 也会丢失 Body,在 iOS 11.3 以后 WebKit 做了优化只会丢失 Blob 类型数据。 - 一致性:
WKWebView发出的请求被NSURLProtocol拦截后行为可能发生改变,比如想取消 video 标签的视频加载一般都是将资源地址 (src) 设置为空,但此时stopLoading方法却不会调用,相比而言WKURLSchemeHandler表现正常。
调研的结论是:WKURLSchemeHandler 在隔离性、稳定性、一致性上表现优于 NSURLProtocol,但是想在生产环境投入使用必须要解决 Body 丢失的问题。
WKWebView的问题解决:NSURLProtocol拦截http、https不到的问题解决
这里主要讲下上文中NSURLProtocol在WKWebView中的兼容问题(http、https请求NSURLProtocol拦截不到的问题)。
我们下载<WebKit/WebKit.h>的源码来进行阅读。
全局搜索关键字NSURLProtocol,如下
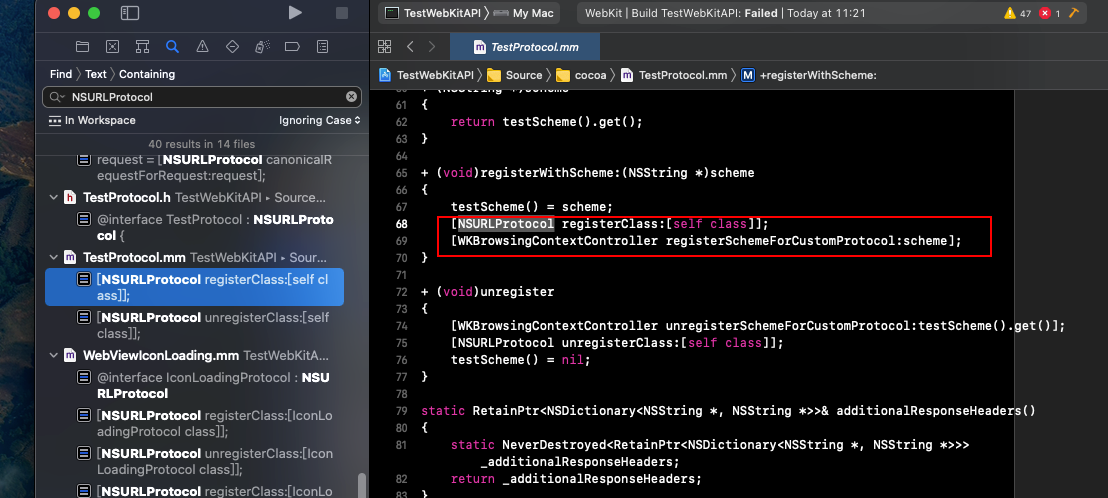
其实能看到很多我们熟悉的代码[NSURLProtocol registerClass:[self class]],然后就会发现,下面都接着一行[WKBrowsingContextController registerSchemeForCustomProtocol:scheme]
再全局搜下,NSURLProtocol的继承方法canInitWithRequest:,还是能找到示例的继承至NSURLProtocol的子类
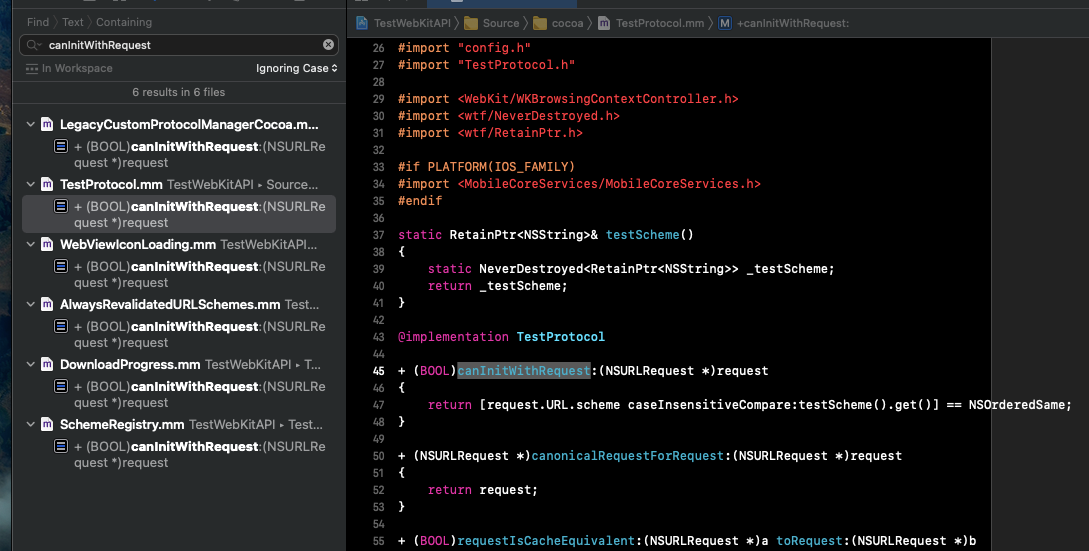
发现,发现webkit中其实和NSURLProtocol有关联的,内部有调用+ [NSURLProtocol canInitWithRequest:]
点进webkit源码中的TestProtocol.mm可以看到,整体的结构我们都差不多,但是我注意到
1
2
3
4
5
+ (void)registerWithScheme:(NSString *)scheme {
    testScheme() = scheme;
    [NSURLProtocol registerClass:[self class]];
    [WKBrowsingContextController registerSchemeForCustomProtocol:scheme];
}
registerSchemeForCustomProtocol实现如下
1
2
3
4
5
6
7
8
9
10
11
12
13
14
15
16
17
18
19
20
21
22
23
[WKBrowsingContextController registerSchemeForCustomProtocol:testScheme];

// 实现如下
+ (void)registerSchemeForCustomProtocol:(NSString *)scheme {
    if ([NSThread isMainThread])
        WebKit::WebProcessPool::registerGlobalURLSchemeAsHavingCustomProtocolHandlers(scheme);
    else {
        // This cannot be RunLoop::main().dispatch because it is called before the main runloop is initialized.  See rdar://problem/73615999
        WorkQueue::main().dispatch([scheme = retainPtr(scheme)] {
            WebKit::WebProcessPool::registerGlobalURLSchemeAsHavingCustomProtocolHandlers(scheme.get());
        });
    }
}

void WebProcessPool::registerGlobalURLSchemeAsHavingCustomProtocolHandlers(const String& urlScheme) {
    if (!urlScheme)
        return;

    InitializeWebKit2();
    globalURLSchemesWithCustomProtocolHandlers().add(urlScheme);
    for (auto networkProcess : NetworkProcessProxy::allNetworkProcesses())
        networkProcess->registerSchemeForLegacyCustomProtocol(urlScheme);
}
通过分析猜想,WKWebview并不是不走NSURLProtocol,而是需要满足他的一个规则,他才会在入口函数这里返回YES来给你放行,这个规则便是你所请求的URL的Scheme要和它内部配置的CustomScheme相同。不过这里有一个疑问,苹果在使用webkit时候为什么会把http/https这样大众化的scheme过滤掉,看来他是不建议开发者来使用NSURLProtocol。接下来我们来看这个CustomScheme,既然苹果内部规定好的那么一定能通过某种方式来注册一个自己的scheme,实在不行就hook。
使用了私有api有一定的审核风险, 由于要拦截wkwebview的http/https请求 必须要使用私有api WKBrowsingContextController
我们可以使用ASCII编码混淆方式进行编码
1
2
3
4
5
6
7
8
9
10
11
12
13
14
15
16
17
18
19
20
21
22
23
24
25
//开启wkwebview 网络拦截
char cc[] = {0x57,0x4b,0x42,0x72,0x6f,0x77,0x73,0x69,0x6e,0x67,0x43,0x6f,0x6e,0x74,0x65,0x78,0x74,0x43,0x6f,0x6e,0x74,0x72,0x6f,0x6c,0x6c,0x65,0x72,'\0'};
NSString *ccString = [NSString stringWithCString:cc encoding:NSASCIIStringEncoding];
char rs[] = {0x72,0x65,0x67,0x69,0x73,0x74,0x65,0x72,0x53,0x63,0x68,0x65,0x6d,0x65,0x46,0x6f,0x72,0x43,0x75,0x73,0x74,0x6f,0x6d,0x50,0x72,0x6f,0x74,0x6f,0x63,0x6f,0x6c,0x3a,0x00,'\0'};
NSString *rsString = [NSString stringWithCString:rs encoding:NSASCIIStringEncoding];
id contextController = NSClassFromString(ccString);
if (!contextController) {
  	return;
}
SEL performSEL = nil;
performSEL = NSSelectorFromString(rsString);
#pragma clang diagnostic push
#pragma clang diagnostic ignored "-Warc-performSelector-leaks"
if ([contextController respondsToSelector:performSEL]) {
  	[contextController performSelector:performSEL withObject:@"http"];
  	[contextController performSelector:performSEL withObject:@"https"];
  	self.wkWebviewNetworkProxy = YES;                                       //标识开启wkwebview 网络代理
} else {
  	NSAssert(NO, @"wk拦截失败");
}
#pragma clang diagnostic pop
} @catch (NSException *e) {
  	YXLogInfo(@"%@",e);
  	return;
}
WKWebView的问题解决:Body丢失问题
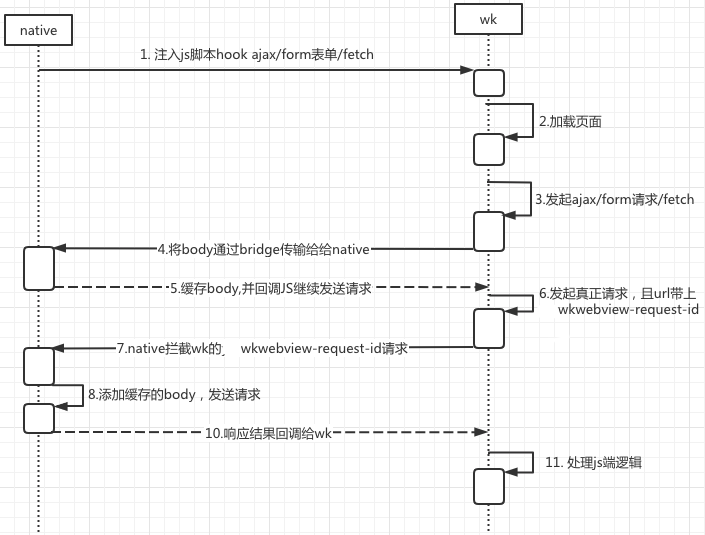
wkwebview 开启拦截wkwebview的http/https请求,webview里post请求的body会丢失。ajax请求、form表单请求、fetch请求的body都会丢失。
我们通过修改 JavaScript 原生的 Fetch / XMLHttpRequest 等接口实现来提前拿到 Body 数据,方案设计如下图所示:
初始化WKWebiew的注入js
1
2
3
4
5
6
7
8
9
10
11
12
13
//注入脚本
WKUserContentController *wkUserContent = userContentControlle;
NSString *path = [[NSBundle mainBundle] pathForResource:@"wkwebview-interceptor" ofType:@"js"];
NSString *jsScript = [NSString stringWithContentsOfFile:path encoding:NSUTF8StringEncoding error:nil];
if ([jsScript yx_isValidString]) {
  	WKUserScript *userScript = [[WKUserScript alloc] initWithSource:jsScript injectionTime:WKUserScriptInjectionTimeAtDocumentStart forMainFrameOnly:NO];
  	[wkUserContent addUserScript:userScript]; //注入hook脚本
}
//增加wkwebview mesage handler
//通信,通过注入的脚本,获取到header和body
[wkUserContent addScriptMessageHandler:[WKwebviewAjaxRequest new] name:@"XHRCALL"];
//通信,通过注入的脚本,获取到cookie
[wkUserContent addScriptMessageHandler:[WKDocumentSetCookie new] name:@"COOKIECALL"];
脚本替换Fetch实现
注入的脚本主要完成的事情是:修改 Fetch 接口的处理逻辑,在请求发出去之前能将 Body 等参数收集起来传递给原生应用。通过这种方式来解决body丢失的问题。
1
2
window.fetch = function(url, options){
}
注入脚本的实习细节感兴趣的可以底部评论
修复Body缺失问题
即上图中的第八步
1
2
3
4
5
6
7
8
9
10
11
12
13
14
15
16
17
18
19
20
21
22
23
24
25
26
27
28
29
30
31
32
33
34
35

- (id)initWithRequest:(NSURLRequest *)request cachedResponse:(NSCachedURLResponse *)cachedResponse client:(id<NSURLProtocolClient>)client {
    NSString *requestId = [request.URL webCache_isHookedRequestId];

    if ([requestId isValidString] && ![request webCache_isShouldSaveBodySync]) {
        //同步虚拟请求不要拿出body, 只有正式请求才取出body
        NSMutableURLRequest *mRequest = request.mutableCopy;
      	//获取到注入脚本传输过来的body
        id body =  [[WebCacheStoreManager shareWebCacheStoreManger] getBodyForRequestIdAndRemove:requestId];
      	//获取到注入脚本传输过来的header
        NSDictionary<NSString *, NSString *> *header = [[WebCacheStoreManager shareWebCacheStoreManger] getHeaderForRequestIdAndRemove:requestId];
        NSData *bodyData = nil;
        if ([body isValidString]) {
            bodyData = [body dataUsingEncoding:NSUTF8StringEncoding];
        } else if ([body isKindOfClass:NSDictionary.class]) {
            NSError *error = nil;
            bodyData = [NSJSONSerialization dataWithJSONObject:body options:0 error:&error];
            if (error) {
                LogInfo(@"%@",error);
            }
        } else if ([body isKindOfClass:NSData.class]) {
            bodyData = body;
        }
        [header enumerateKeysAndObjectsUsingBlock:^(NSString * _Nonnull key, NSString * _Nonnull obj, BOOL * _Nonnull stop) {
            if ([key isValidString] && [obj isValidString]) {
                [mRequest setValue:obj forHTTPHeaderField:key];
            }
        }];

        mRequest.HTTPBody = bodyData;
        request = mRequest.copy;
    }
    return [super initWithRequest:request cachedResponse:cachedResponse client:client];
}
请求Body传输协议
| 属性 | 含义 | 数据类型 | 是否必须 |
|---|---|---|---|
| requestId | 请求id,全局唯一 | string | 是 |
| body | 请求body | object | 是 |
| headers | 请求Header | Dictionary<NSString, NSString> | 否 |
| wkwebview-request-id | url参数带上真实请求id key | string | 否 |
1
2
3
4
5
6
7
8
//js -> native(将请求body传给客户端)
window.webkit.messageHandlers.YXXHRCALL.postMessage({"requestId":"****",body:{}})

//native->js (客户端保存body保存成功回调)
window.yx_realxhr_callback(requestId)

//正式请求id通过url参数传递给客户端:  js->native
yx-wkwebview-request-id=qjyuim27rn91593759831452
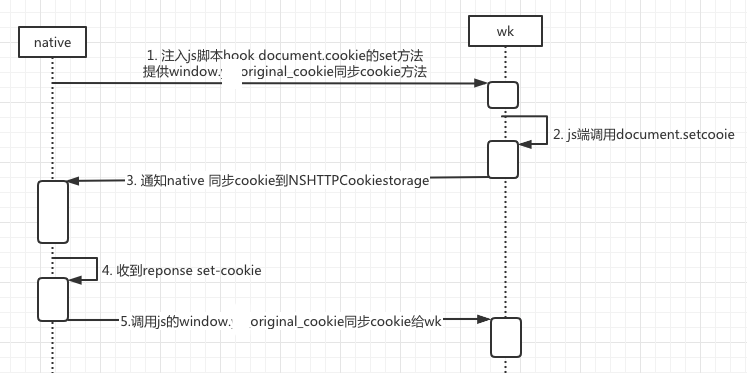
WKWebView的问题解决:Cookie同步问题
- wk开启http/https请求拦截之后会导致wk里的请求header里的cookie默认从 NSHTTPCookieStorage里取,没有从wkcookie里取。导致js document里设置的cookie ,请求header没有带上。
- 开启拦截之后,reponse里的set-cookie会自动同步到NSHTTPCookieStorage里,没有同步到wkcookie,导致document.拿不到cookie。
Cookie同步流程
- docuemnt.setcookie 通知客户端将cookie同步到NSHTTPCookieStorage
- 收到请求的response,将response set-cookie通过js 同步到wkCookie。(ios11以上使用WKWebsiteDataStore进行同步)
- 根据请求的header里的x-wkwebview-request-type ,标识当前请求的response set-cookie 需要阻塞式同步到wkwebview.
1
2
3
4
5
6
7
8
9
10
11
12
13
14
15
16
17
18
19
20
21
22
23
24
25
26
27
28
29
30
31
32
33
34
35
36
//document设置cookie
- (void)userContentController:(WKUserContentController *)userContentController
      didReceiveScriptMessage:(WKScriptMessage *)message {

    NSDictionary *body  = message.body;
    NSMutableDictionary<NSHTTPCookiePropertyKey, id> *tmpMDic = [NSMutableDictionary dictionary];
    if([body valueForKey:@"name"]) {
        [tmpMDic setValue:[body valueForKey:@"name"] forKey:NSHTTPCookieName];
    }
    if ([body valueForKey:@"value"]) {
        [tmpMDic setValue:[body valueForKey:@"value"] forKey:NSHTTPCookieValue];
    }
    if ([body valueForKey:@"originurl"]) {
        [tmpMDic setValue:[body valueForKey:@"originurl"] forKey:NSHTTPCookieOriginURL];
    }
    if ([body valueForKey:@"domain"]) {
        [tmpMDic setValue:[body valueForKey:@"domain"] forKey:NSHTTPCookieDomain];
    }
    if ([body valueForKey:@"path"]) {
        [tmpMDic setValue:[body valueForKey:@"path"] forKey:NSHTTPCookiePath];
    }
    if ([body valueForKey:@"expires"]) {
        [tmpMDic setValue:[[WebViewCacheManager cookieDateFormatter] dateFromString:[body valueForKey:@"expires"]] forKey:NSHTTPCookieExpires];
    }
    if ([body valueForKey:@"maximumage"]) {
        [tmpMDic setValue:[body valueForKey:@"maximumage"] forKey:NSHTTPCookieMaximumAge];
    }
    if ([body valueForKey:@"secure"]) {
        [tmpMDic setValue:@(YES) forKey:NSHTTPCookieSecure];
    }

    [tmpMDic setValue:kWebCacheWkwebviewFromDocumentCookieIdentifier forKey:NSHTTPCookieComment];

    NSHTTPCookie *cookie = [[NSHTTPCookie alloc] initWithProperties:tmpMDic.copy];
    [[NSHTTPCookieStorage sharedHTTPCookieStorage] setCookie:cookie];
}
document.setCookie传输协议
| 属性 | 含义 | 数据类型 | 是否必须 |
|---|---|---|---|
| name | cookie 名称 | string | 是 |
| value | cookie 值 | object | 是 |
| originurl | cookie 原始url | string | 否 |
| domain | cookie 域名 | string | 是 |
| path | cookie path | string | 是 |
| expires | cookie 过期时间 | string | 否 |
| maximumage | cookie max过期时间 | string | 否 |
| secure | cookie secure | string | 否 |
同步cookie的js方法
1
2
3
4
5
//js->native (docuemnt.setcookie 通知客户端同步到NSHTTPCookieStorage)
window.webkit.messageHandlers.COOKIECALL.postMessage({"**":"****"})

//native->js (客户端将NSHTTPCookieStorage同步到 js的document)
window.original_cookie='****';
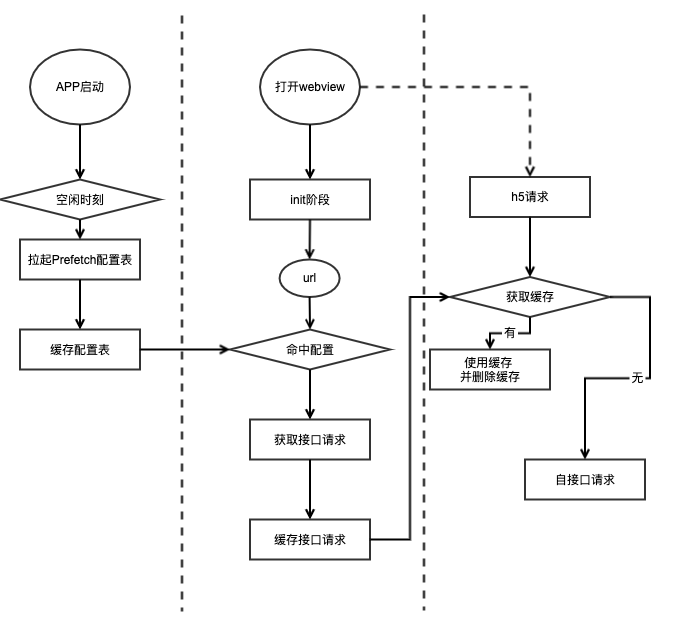
2. Prefetch
帮助h5做接口请求,缓存接口数据给h5用
普通页面首屏声明周期

Prefetch页面首屏声明周期

客户端流程图
配置表协议
1
2
3
4
5
6
7
8
9
10
11
12
13
14
15
16
17
18
19
20
21
22
23
24
25
26
27
28
29
30
{
  "code": 200,
  "data": {
    "name": "prefetchConfig",
    "version": "4",
    "config": [
      {
        "url": "https://test.*****.com/act/pre/ApRflg5XnZqP.html",
        "interfaces": [
          {
            "api": "https://test.*****.com/act/napi/distribution/info",
            "method": "GET",
            "urlParam": true
          },
          {
            "api": "https://test.*****.com/topic/v1/ding/sinkList.json",
            "method": "POST",
            "urlParam": true,
            "bodyParam": true,
            "body": {
              "visitRecord": {

              }
            }
          }
        ]
      }
    ]
  }
}
urlParam和bodyParam
get请求 urlParam: true
1
2
3
4
5
6
7
8
9
10
11
12
13
{
    url: 'https//m.******.com/help/new?id=163&itemId=126',
    interfaces: [
        {
            api: 'https://m.******.com/xx.json',
            method: 'get',
            urlParam: true
        }
    ]
}

// 代理请求结构
https://m.******.com/xx.json?id=163&itemId=126
post请求 urlParam: true bodyParam: true
1
2
3
4
5
6
7
8
9
10
11
12
13
14
15
16
17
18
19
20
21
22
23
24
25
26
27
28
29
30
31
32
33
34
35
36
37
38
39
40
41
42
43
44
45
46
47
48
49
50
51
52
53
54
55
56
57
58
59
60
61
62
63
64
65
66
67
68
// urlParam: true
{
    url: 'https//m.******.com/help/new?id=163&itemId=126',
    interfaces: [
        {
            api: 'https://m.******.com/xx.json',
            method: 'get',
            urlParam: true,
            body: {
                cityId: 123456
            }
        }
    ]
}
// 代理请求结构
https://m.******.com/xx.json?id=163&itemId=126
body: {
    cityId: 123456
}


// bodyParam: true
{
    url: 'https//m.******.com/help/new?id=163&itemId=126',
    interfaces: [
        {
            api: 'https://m.******.com/xx.json',
            method: 'get',
            bodyParam: true,
            body: {
                cityId: 123456
            }
        }
    ]
}
// 代理请求结构
https://m.******.com/xx.json
body: JSON.stringify({   // 字符串,这里为了数据展示,改成JSON.stringify表示
    cityId: 123456,
    id: 163,
    itemId: 126
})


// urlParam: true
// bodyParam: true
{
    url: 'https//m.******.com/help/new?id=163&itemId=126',
    interfaces: [
        {
            api: 'https://m.******.com/xx.json',
            method: 'get',
            urlParam: true
            bodyParam: true,
            body: {
                cityId: 123456
            }
        }
    ]
}
// 代理请求结构
https://m.******.com/xx.json?id=163&itemId=126
body: JSON.stringify({   // 字符串,这里为了数据展示,改成JSON.stringify表示
    cityId: 123456,
    id: 163,
    itemId: 126
})
3. 容器预热
容器预热,即是将WKWebView进行提前加载,需要注意的就是很多业务逻辑都是需要通过url去实时加载的,可以做到的是能先提前加载的就提前加载好
方案很简单,项目中注意就是各类脚本注入的问题,可参考文章,WKWebView复用池
4. DNS-Prefetch
简介
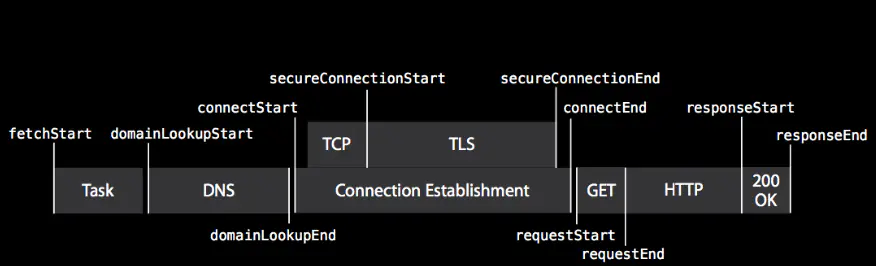
DNS-Prefetch解决的就是上图中,DNS解析的时间优化。
DNS Prefetch,即DNS预获取,是H5加载优化的一部分。一般来说,在前端优化中与 DNS 有关的有两点: 一个是减少DNS的请求次数,另一个就是进行DNS预获取 。
DNS 作为互联网的基础协议,其解析的速度似乎很容易被网站优化人员忽视。现在大多数新浏览器已经针对DNS解析进行了优化,典型的一次DNS解析需要耗费 20-120 毫秒,减少DNS解析时间和次数是个很好的优化方式。DNS Prefetching 是让具有此属性的域名不需要用户点击链接就在后台解析,而域名解析和内容载入是串行的网络操作,所以这个方式能 减少用户的等待时间,提升用户体验 。
针对移动端出现的大量应用内请求失败的调研,运营商 LocalDNS 被劫持导致请求失败出现频率较高。传统的 UDP LocalDNS 解析容易遭到劫持,针对此种情况,提出的通过 HTTP 请求解析 domain,成功规避了 LocalDNS 被劫持的可能。
HTTPDNS 通过 HTTP 接口对外提供域名解析服务,然后直接使用解析到的 IP 地址去请求原来的服务,从而绕过运营商的Local DNS
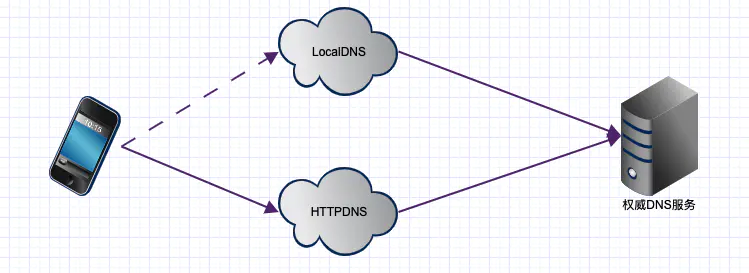
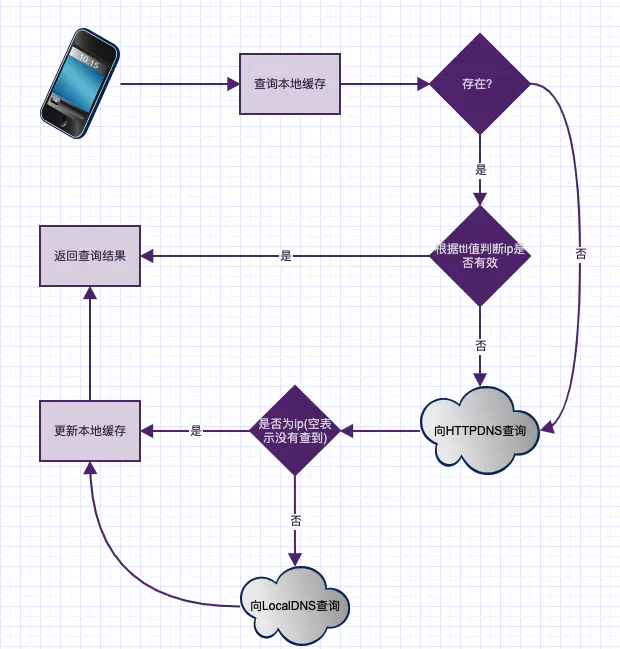
HTTPDNS我们这里项目中用的是网易杭研提供的HTTPDNS服务,HTTPDNS更新策略和LocalDNS优先逻辑如下:
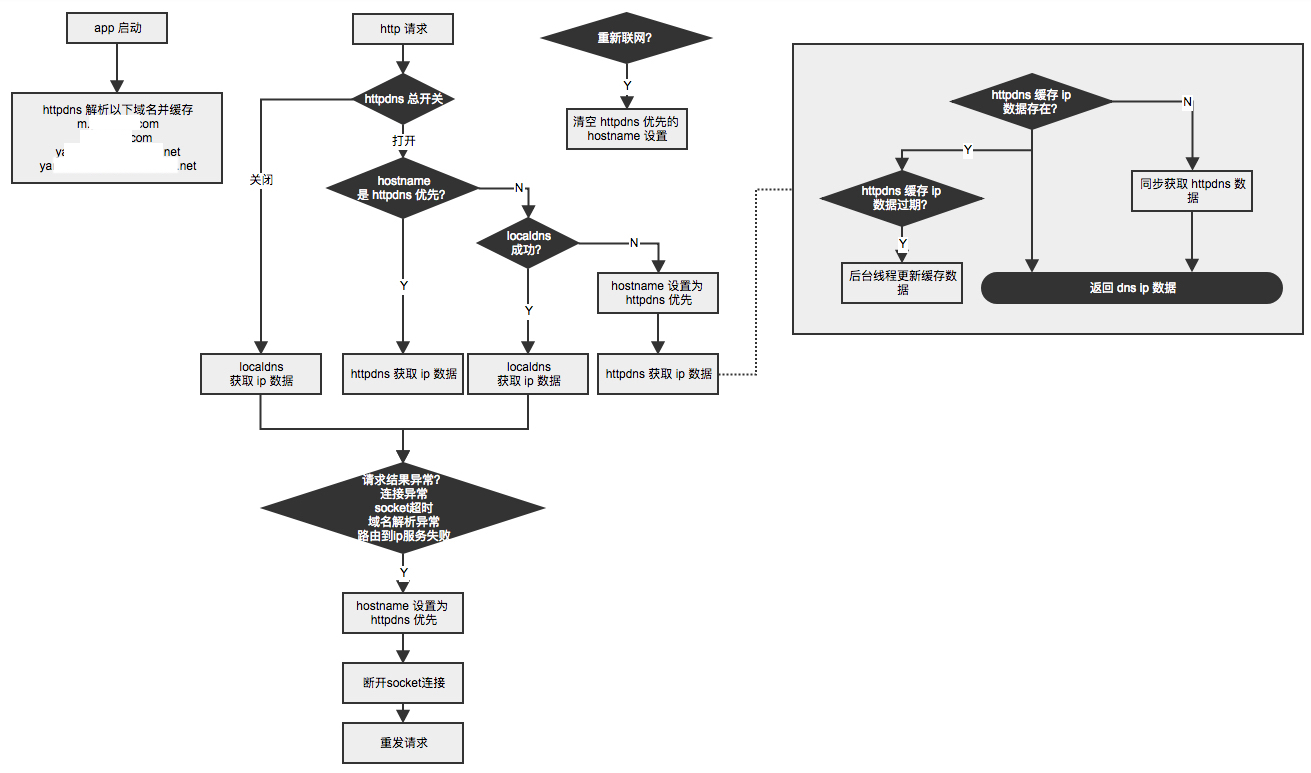
通过HTTPDNS获取到IP之后,我们就需要通过IP直连的方式链接到服务器,但是会导致两个问题:
- 证书HOST检验问题
- SNI问题
https 裸ip证书校验
终端在SSL握手过程会校验当前请求URL的HOST是否在服务端证书的可选域名列表里。
比如想要请求https://a.html5.qq.com,使用IP直连接后实际请求的URL为:https://183.21.152.52:443此时服务端返回的证书可选域名列表如下:

由于请求的HOST域名被替换成IP,导致底层在进行证书验证的时候验证失败。
解决办法:在证书检验的方法会调用,使用原始域名进行校验,如下
1
2
3
4
5
6
7
8
9
10
11
12
13
14
15
16
17
18
19
20
21
22
23
24
25
26
27
28
29
30
31
32
33
34
35
36
37
38
39
40
41
42
43
44
45
46
47
//裸ip证书校验
- (void)URLSession:(NSURLSession *)session task:(NSURLSessionTask *)task didReceiveChallenge:(NSURLAuthenticationChallenge *)challenge completionHandler:(void (^)(NSURLSessionAuthChallengeDisposition disposition, NSURLCredential *credential))completionHandler {

    NSURLSessionAuthChallengeDisposition disposition = NSURLSessionAuthChallengePerformDefaultHandling;
    __block NSURLCredential *credential = nil;

    if ([challenge.protectionSpace.authenticationMethod isEqualToString:NSURLAuthenticationMethodServerTrust]) {

        //获取原始域名
        NSString* host = [[self.request allHTTPHeaderFields] objectForKey:@"host"];
        if (![host yx_isValidString]) {
            host = self.request.URL.host;
        }

        if ([HTTPDNSManager shareHttpDnsManager].httpDnsServiceIsStarted &&
            [HTTPDNSManager shareHttpDnsManager].allowUseHTTPDNS &&
            [host isValidString]) {
            //httpdns 证书校验
            credential = [NSURLCredential credentialForTrust:challenge.protectionSpace.serverTrust];
            disposition = NSURLSessionAuthChallengeUseCredential;
        } else {
            //SD默认证书校验分支
            if (!(self.options & SDWebImageDownloaderAllowInvalidSSLCertificates)) {
                disposition = NSURLSessionAuthChallengePerformDefaultHandling;
            } else {
                //允许使用野鸡证书
                credential = [NSURLCredential credentialForTrust:challenge.protectionSpace.serverTrust];
                disposition = NSURLSessionAuthChallengeUseCredential;
            }
        }
    } else {
        if ([challenge previousFailureCount] == 0) {
            if (self.credential) {
                credential = self.credential;
                disposition = NSURLSessionAuthChallengeUseCredential;
            } else {
                disposition = NSURLSessionAuthChallengeCancelAuthenticationChallenge;
            }
        } else {
            disposition = NSURLSessionAuthChallengeCancelAuthenticationChallenge;
        }
    }

    if (completionHandler) {
        completionHandler(disposition, credential);
    }
}
https SNI适配
解决了上述问题后,理论上就可以进行IP直连。但是还会有存在:一个IP转发层部署了多个域名的证书(SNI情况)。而终端使用IP直连时,服务端SSL握手阶段会获取到域名调度后的IP,服务端无法找到匹配证书时,只能返回默认的证书或者不返回,没有可匹配的证书,导致校验失败。
SNI(Server Name Indication)是为了解决一个服务器使用多个域名和证书的SSL/TLS扩展。它的工作原理如下:
- 在连接到服务器建立SSL链接之前先发送要访问站点的域名(Hostname)。
- 服务器根据这个域名返回一个合适的证书。
通常情况下我们的证书是和域名绑定的,有时候会存在一个 IP 对应多个域名的情况,这种情况如果客户端 IP 直连的时候,没有告诉服务端他要请求的是哪个域名的证书,服务端就没办法返回正确的证书,从而导致客户端证书校验失败。
SNI 的全称 Server Name Indication,为了解决一个服务器使用多个域名和证书的 SSL/TLS 扩展。在连接到服务器建立 SSL 连接时,客户端可以在第一次握手的 Client Hello 中的 SNI 扩展字段中填入要访问站点的域名(Hostname),这样服务器就可以根据域名返回一个合适的证书。
我们在进行 IP 直连的时候,面对单 IP 多域名的情况需要客户端手动配置 SNI 字段,但是上层的网络库 NSURLSession、NSURLConnection 都没有提供配置的接口,我们需要使用更加底层的 libcurl 库和 CFNetwork 来完成 SNI 字段的配置。
- 使NSURLSession支持SNI
1
2
3
4
5
6
7
8
9
10
11
12
13
14
@try {
            //使用私有API 使NSURLSession支持SNI
            NSString *sslStr = @"_ssl";
            NSString *settingStr = @"Settings";
            NSString *finalStr = [NSString stringWithFormat:@"%@%@",sslStr,settingStr];
            NSMutableDictionary *dict = [[self.dataTask valueForKey:finalStr] mutableCopy];
            NSString *host = [self.request.allHTTPHeaderFields valueForKey:@"host"];
            [dict setValue:host forKey:(__bridge NSString *)kCFStreamSSLPeerName];
            [self.dataTask setValue:dict forKey:finalStr];
        } @catch (NSException *e) {
            //使用私有api出现异常,关闭httpdns
            [HTTPDNSManager shareHttpDnsManager].allowUseHTTPDNS = NO;
            LogWarn(@"httpdns support SNI fail, then forbid httpdns");
        }
- CFNetwork
1
2
3
4
5
6
7
8
// HTTPS 请求处理 SNI 场景
NSString *host = [self.swizzleRequest.allHTTPHeaderFields objectForKey:@"host"];
if (!host) {
host = self.originalRequest.URL.host;
}
[self.inputStream setProperty:NSStreamSocketSecurityLevelNegotiatedSSL forKey:NSStreamSocketSecurityLevelKey];
NSDictionary *sslProperties = @{ (__bridge id) kCFStreamSSLPeerName : host };
[self.inputStream setProperty:sslProperties forKey:(__bridge_transfer NSString *) kCFStreamPropertySSLSettings];
为什么DNS采用UDP协议 ?
TCP通信过程太复杂并且开销大,一次TCP交换需要9个包: 三个连接包,四个断开包,一个request包,一个响应包。
UDP通信过程简单,只需要一个查询包和一个响应包。
附录
开元的拦截脚本,IMYWebLoader
添加几个项目中碰到的问题的记录链接,基本都是和项目强相关的问题,所以不做过多介绍
wk拦截同firbase performance的hook冲突会导致崩溃,崩溃信息如下,评估和wk拦截有关是因为将xcache的abt试验停掉之后,崩溃量就下来了
1
2
3
4
5
6
7
8
9
10
11
12
13
14
15
16
17
18
19
20
21
22
23
24
25
26
Crashed: com.demo.webview.downloadQueue (QOS: USER_INITIATED)
0  libsystem_kernel.dylib         0x1d8f86414 __pthread_kill + 8
1  libsystem_pthread.dylib        0x1f6ae0b50 pthread_kill + 272
2  libsystem_c.dylib              0x1b445fb74 abort + 104
3  libsystem_malloc.dylib         0x1bae3d49c _malloc_put + 558
4  libsystem_malloc.dylib         0x1bae3d740 malloc_zone_error + 104
5  libsystem_malloc.dylib         0x1bae22ab0 szone_free + 464
6  CoreFoundation                 0x1aafce62c __CFStringDeallocate + 192
7  CoreFoundation                 0x1aafaf104 _CFRelease + 248
8  Demo                           0x1057e8550 -[FPRNetworkTrace didCompleteRequestWithResponse:error:] + 248
9  Demo                           0x1057ec894 __InstrumentURLSessionTaskDidCompleteWithError_block_invoke + 176
10 CFNetwork                      0x1ab80a7cc _CFNetworkHTTPConnectionCacheSetLimit + 154256
11 Foundation                     0x1ac380850 __NSBLOCKOPERATION_IS_CALLING_OUT_TO_A_BLOCK__ + 24
12 Foundation                     0x1ac26d740 -[NSBlockOperation main] + 104
13 Foundation                     0x1ac382ca4 __NSOPERATION_IS_INVOKING_MAIN__ + 24
14 Foundation                     0x1ac26d3c8 -[NSOperation start] + 808
15 Foundation                     0x1ac38374c __NSOPERATIONQUEUE_IS_STARTING_AN_OPERATION__ + 24
16 Foundation                     0x1ac3831d4 __NSOQSchedule_f + 184
17 libdispatch.dylib              0x1aac33fb8 _dispatch_block_async_invoke2 + 148
18 libdispatch.dylib              0x1aac25db0 _dispatch_client_callout + 20
19 libdispatch.dylib              0x1aac2912c _dispatch_continuation_pop + 416
20 libdispatch.dylib              0x1aac28854 _dispatch_async_redirect_invoke + 592
21 libdispatch.dylib              0x1aac3693c _dispatch_root_queue_drain + 356
22 libdispatch.dylib              0x1aac37120 _dispatch_worker_thread2 + 116
23 libsystem_pthread.dylib        0x1f6ae17d8 _pthread_wqthread + 216
24 libsystem_pthread.dylib        0x1f6ae876c start_wqthread + 8
参考文章
NSURLProtocol对WKWebView的处理 - 网易云音乐
UIWebView (NSURLProtocol)拦截js、css
iOS使用NSURLProtocol来Hook拦截WKWebview请求并回放的一种姿(ti)势(wei)
iOS 开发中使用 NSURLProtocol 拦截 HTTP 请求